Monday, May 24, 2010

Roast Salmon Provençal

Friday after work I got home and started cooking. I had found a tasty-looking fish recipe I wanted to try. It ended up being DELICIOUS so I am happy I tried it out.

----------

Roast Salmon Provencal

Ingredients
- 4 salmon fillets or steaks, 1/2 inch thick (1 to 1 1/4 lb)
- 3 cups refrigerated unpeeled potato wedges (from 1-lb 4-oz bag)
- 1 1/2 cups small whole fresh mushrooms
- 1 medium red bell pepper, cut into 1-inch pieces
- 1 medium zucchini, cut into 1/2-inch pieces
- 1/2 cup fat-free Italian dressing
- 1/2 teaspoon dried basil leaves
- 1/4 cup pitted kalamata or ripe olives

Directions
- Heat oven to 425°F.
- Spray 15x10x1-inch pan with cooking spray.
- Place salmon, potatoes, mushrooms, bell pepper and zucchini in pan.
- Brush with half of the dressing; sprinkle with basil.
- Bake 20 minutes.
- Add olives to pan and stir vegetables slightly.
- Drizzle remaining dressing over salmon and vegetables.
- Bake 5 to 10 minutes longer or until fish flakes easily with fork and potatoes are tender.

----------
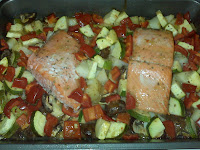
Ok, so I only used 2 salmon fillets, and I didn't measure out my vegetables (of course). I diced up 2 big potatoes, quartered a container of button mushrooms (the only kind I'll eat), and used a whole pepper and a whole zucchini. I don't like olives so I left those out. I also didn't measure the dressing. Once I had everything in the pan, I just drizzled the dressing right over the food but then forgot to add the Basil. After 20 min, I drizzled more dressing over the dish, and this time remembered to sprinkle some basil over everything.

Once I took it out of the oven, I let it cool...and when I took a bike I was PLEASANTLY surprised. I'm not sure why though, since I LOVE fish, LOVE veggies, and of course LOVE Italian dressing. Maybe I was just excited because of all the flavor the dressing gave it (usually I just squeeze some lemon over the fish). Either way, I ate half of what I made (it is supposed to be 4 servings...oops).

Anyways, try it out - and feel free to add any other vegetables you like!!

- Enjoy! apes -

Friday, May 21, 2010

Mexican Bean Salad

I tried out this new recipe (vegetarian friendly), which would have been perfect for our cinco de mayo party...but I guess since I still made it in May, it still works, right?

----------

Mexican Bean Salad

Ingredients
Salad
- 2 cans (15 oz each) Progresso® black beans, drained, rinsed
- 1 can (15 oz) Progresso® dark red kidney beans, drained, rinsed
- 1 can (11 oz) Green Giant® Niblets® no-salt-added whole kernel sweet corn, drained
- 1 1/2 cups grape tomatoes, each cut in half
- 1 cup chopped green bell pepper (1 medium)
- 1 cup chopped red bell pepper (1 medium)
- 1/2 cup sliced green onions (8 medium)
- 1/4 cup chopped fresh cilantro

Dressing
- 3 tablespoons white wine vinegar or cider vinegar
- 3 tablespoons canola oil
- 1 tablespoon chili powder
- 1/2 teaspoon salt
- 1/4 teaspoon pepper

Directions
- In large bowl, mix salad ingredients. In small bowl, mix dressing ingredients with wire whisk until blended.
- Pour dressing over salad; toss to mix. Cover and refrigerate at least 4 hours to blend flavors.

----------
Ok, so I am not big into measuring ingredients exactly, so what I did for the ingredients was use the canned vegetables as the recipe states, but instead of measuring the rest I just used a whole package of grape tomatoes, skipped the green onions (I couldn't find them at the store) and measured the Cilantro. When I measured the Cilantro it looked like a LOT, so I only put in about half of what the recipe stated. Bad Idea. It ended up not having a lot of flavor.

Also - don't try the dressing before you mix it into the salad...it does NOT taste good. Once it mixes with the salad, it comes out much better.

I would def use more chili powder, or add something else to give it a little kick. Other than that though it was good! And it made a lot, so I had more for lunch the next day.

If you want to make this into a salsa, don't drain the vegetables, and add more dressing.

You can also use some soft tortilla shells and make a veggie burrito! (The pic shows it with Naan on the side)

- Enjoy! apes -

Tuesday, May 18, 2010

Lesson: How NOT to make hard-boiled eggs

Making hard-boiled eggs is easy right? Correct.

If you think there's no way to mess THAT up, then gather around for a little story time from this past weekend...

Once upon a time a young broad (yours truly) decided to make some hard-boiled eggs for breakfast. She put 4 eggs in a pot with water, and turned on the stove.

While she waited for the water to boil, she started cleaning her room. As she cleaned her room up, she kept smelling something cooking "Is my neighbor baking this morning?" she pondered. But then she remembered that she has never been able to smell her neighbor's food adventures before, so she went back to cleaning her room.

After a while, she heard a small popping sound. Not like popping gum, but more similar to someone dropping dishes on the counter. "Hmm, did my Roomster come home and start cooking breakfast?" she wondered. She tiptoed to the kitchen, and peered around the corner, but there was no sight of her roomster. Instead she found 4 exploded eggs. "Oh No! I was boiling eggs!" she remembered aloud. There was egg EVERYWHERE....and cleaning it up would be another project in itself.So there, if you think boiling eggs is easy, you'd be right. Just don't forget that they are on the stove...because once the water evaporates, the eggs WILL explode.

....and if anyone knows how to get egg off a ceiling, please let me know.

- A very forgetful apes -

Friday, May 14, 2010

7 Reasons to learn how to cook

I came across this article on reasons you should learn to cook, and decided to share it with you guys. It is more geared towards women, but it can DEF work for everyone.

----------

1. It’s cheaper than eating out
The money you spend on groceries won’t come anywhere near what you’ll spend eating out every night, trust me! Plus, you can take left-overs of the yummy meals you prepare to work the next day for lunch. That way, you’ll save money on lunches and make everyone else in the office jealous while you’re eating Thai Pork and they’re eating peanut butter and jelly sandwiches.

2. It’s easier to diet
If you’re trying to count calories and watch what you eat, then dining out can be a disaster. If you cook what you eat yourself, you’ll know exactly what you’re putting in the dish and how many calories it has.

3. It impresses men
What man isn't impressed with a gorgeous woman who can pop into the kitchen and whip up a scrumptious meal while wearing an apron and heels? It may sound old-fashioned but the way to a man’s heart really is through his stomach!

4. It’s healthier than eating from a can
Anything you’ll eat from a can isn’t going to be nearly as good for you as the same thing you’d cook yourself. Look at the nutrition label, and see how much sodium and fat is in a serving of Chef Boyardee, then see how much is in a serving of ravioli or spaghetti you’d cook from scratch. Not only that, but the stuff you make will taste a lot better, too!

5. It’s relaxing
Cooking is my hobby, and it’s very relaxing to cook a new recipe when I’m not in a rush to make dinner. It’s also a great way to unwind after a busy week — you just start cooking, chopping, peeling, baking etc. while your mind wanders. When you’re done, you have a great meal, and while you’re cooking you may even want to drink some wine…

6. It’s something you can do with your kids
Cooking can always be a fun activity to do with your kids. Kids aren’t able to make a mess very often, are they? Sometimes at school they can paint and make a small disaster, but really, they almost never get to cut loose. Why not let them help you in the kitchen? The counters are made for wiping down, and again, you’ll be teaching a valuable skill, and you’ll have a good meal or baked goodie when you’re done!

7. It will make your mother happy!
You know your mother would love to know you have a talent in the kitchen! While I’m sure she loves it when you take her out for dinner on her birthday or Mother’s Day, I’ll bet she’d love it if you made her a favorite meal at home, too…

----------

While I do like cooking, I mostly cook for me - but I LOVE when I have someone else to cook for to, I like to show off my skills!! :)

Enjoy! - apes -

Thursday, May 13, 2010

Maple - Mustard Baked Chicken

Whew - that's a mouthful, eh?

I made dinner for a friend the other night, and wanted to try out this new recipe I found. When I went to the store I got everything generic brand - so I can only imagine how tasty it would be with "real" branded ingredients!

Below is the recipe, and then my experience making it.
That's some big chicken!!!

----------
Maple - Mustard Baked Chicken

Ingredients
- 3 tablespoons Dijon mustard
- 2 tablespoons pure maple syrup, preferably grade B
- 2 tablespoons peanut or canola oil, divided
- 1 tablespoon finely chopped fresh thyme, or 1 teaspoon dried
- 3/4 teaspoon freshly ground pepper
- 1/2 teaspoon salt
- 4-41/2 pounds bone-in chicken pieces, (thighs, drumsticks and/or breasts), skin removed, trimmed (see Tip)
- 1 1/2 cups fresh breadcrumbs, preferably whole-wheat (see Tip)

Directions
- Whisk mustard, maple syrup, 1 tablespoon oil, thyme, pepper and salt in a large bowl.
- Add chicken and turn to coat evenly.
- Cover and marinate in the refrigerator for at least 30 minutes and up to 6 hours.
- Preheat oven to 400°F. Set a wire rack on a large baking sheet.
- Combine breadcrumbs and the remaining 1 tablespoon oil on a plate.
- Dredge the skinned side of each chicken piece in the breadcrumbs (with drumsticks, dredge the meatier side) and arrange breaded-side up on the wire rack. Leave at least 1 inch between pieces.
- Bake until golden brown and an instant-read thermometer inserted into the thickest part of the meat registers 165°F, 35 to 40 minutes.
-Serve hot or let cool, refrigerate and serve chilled.

----------

Ok, so I made the marinade the night before I was planning on serving the dish. When I made the marinade I thought it looked like an awfully small amount for 4lbs of chicken. So I doubled it all! I think I put in a little too much syrup, but oh well. If you don't like thyme, put less in (duh!). I put the marinade and the chicken in a Ziploc bag and let it marinade overnight (more than 6 hours, but does it REALLY matter?).

The next day I was ready to bake the chicken!

I mixed the breadcrumbs and olive oil. After I coated the chicken with breadcrumbs, I had a TON of breadcrumbs left over. So you DO NOT need 1 1/2 cups of them. You could make due with at most 1 cup. Oh yeah, and mine were seasoned, not whole wheat.

As that baked, I cooked up some side dishes. I only blog about the sides here since they are in the pic below.
Side 1- Diced Potatoes mixed with Onion, I also added garlic salt
Side 2 - Sauteed Squash and Zucchini, I added salt and pepper to taste

Once the chicken was done, I made sure to test it with the meat thermometer (which actually worked). So I served the meal and grubbed down.

Kellen (my friend who came to test out the recipe, also a new blog follower!) seemed to really enjoy the potatoes, and I think just ate the vegetables because "he was supposed to". He said he liked the chicken, but I don't think he really did. I think he just ate it because he knew I wasn't going to make him anything else and he wanted to be nice.

But I on the other hand, thought the chicken came out great! I had 3 pieces, and I went to bring some to work today, but left it at home. UGH! Looks like I'll just bring it to work tomorrow then (or have it for dinner tonight).

The recipe def was easy to make, and almost all the ingredients I had at my house.

Enjoy! - apes -

Butterscotch Cluster/White Choc Peanuts

My dad used to make this AMAZING butterscotch clusters around the holidays when I was younger. He would take up the whole kitchen and make TONS of these clusters. It's how I knew the holidays were around, and I always thought (as all kids do) that they were super hard and complex to make, hence why he only made them once a year. Since growing up I have made the cluster myself...and WOW are they easy! You don't even need an oven!

I decided to modify it a bit as a little snack when I have a sweet tooth. I put the main recipe below, and then my modifications.

----------

Butterscotch Clusters

Ingredients
- Bag of butterscotch morsels
- Peanuts (unsalted works the best)
- Dry chow mien noodles (found in the international food aisle)
- Wax Paper

Directions
- Melt the butterscotch (I usually just toss them in the microwave for 45 sec intervals, stirring in between)
- Add the peanuts and dry noodles to the melted butterscotch and mix
- Spoon (with your hands) clumps of the mix onto the wax paper
- Let harden, then stuff your face!!!

----------

When I modified the recipe I use white chocolate morsels and then just mixed peanuts into the melted chocolate. Then I made smaller clusters, and let harden. SUPER EASY, and QUITE tasty! Perfect for when you have a sweet tooth and need a fix!
banging white chocolate peanuts!
A great idea is to make these when you are visiting a friend, or staying at their house. You should never show up empty handed, and people usually bring a bottle of wine (works well in my place!) but for those non-drinkers, or those "non-winers" you can give them this as an original gift.

Enjoy!- apes -

Wednesday, May 5, 2010

Tequila Twist

Happy Cinco-de-Mayo!!

While you're at the bar, or being the bartender, try one of these shots!


----------

Tequila Twist (Makes 4-5 shooters)

Ingredients
- Ice for shaker
- 6 oz. tequila
- 1 cup (8 oz) orange juice
- 1 oz fresh lime juice
- finely grated rind from 1/2 of a lime
- sugar
- strawberries or orange wedges

Directions
- Place 5-6 large shot glasses in the freezer until frosty.
- Use a lime wedge to moisten the rim of each glass and dip the rim in a small plateful of sugar.
- In a shaker combine tequila, orange juice, lime juice and lime rind.
- Shake vigorously for 10-20 seconds until ingredients are incorporated.
- Let it sit for about a minute to allow the lime rind to flavor the mixture.
- Add ice to shaker, shake again to cool and then pour into each glass.
- Garnish each glass with a strawberry (optional to use an orange slice to garnish)

----------

Easiest way to do this? At our cookout this weekend I just made a water bottle full of these, and poured them into the shot glasses, and garnished with strawberries (after a while, left off the garnish). I left off the sugar, because I couldn't carry that all around at once.

- Disfruta! apes -

Tuesday, May 4, 2010

Flour Tortilla Dessert

Tomorrow is cinco-de-mayo. So grab your margarita glasses and your sombreros and celebrate your Mexican heritage!

In honor of the holiday, I would like to share a SUPER easy (no oven needed) and tasty dessert recipe. I've put my modifications in this blue-ish color.

----------

Flour Tortilla Dessert

Ingredients
- 4 flour tortillas I was an idiot so I got corn tortillas. DO NOT USE CORN TORTILLAS!
- ¼ cup chopped peanuts
- ¼ cup raisins
- ¼ teaspoon cinnamon
- 2 thinly sliced bananas
- 2 tablespoons chocolate sprinkles I didn't use these at all
- 1 cup whipped cream I forgot about the whipped cream
- ¼ cup blueberries Figured this was optional, so didn't do
- ¼ cup raspberries Figured this was optional, so didn't do
- ½ cup peanut butter
- 2 tablespoons white sugar
- 2 tablespoons honey

Directions
- Spread a tablespoon of peanut butter over each flour tortilla, leaving an inch border.
- Mix the raisins, cinnamon, bananas, honey and white sugar together.
- Spoon this mixture into the center of each flour tortilla.
- Sprinkle the chopped peanuts over the top. I only half paid attention to the recipe, so I mixed the nuts up with the raisin/cinn/banana/honey/sugar mix.
- Fold the sides of the tortilla to meet in the middle then roll them up and put them seam-side down on a serving platter.
- Sprinkle the sugar over them. Oops, forgot that part.
- Divide the whipped cream between the tortilla wraps and decorate with the chocolate sprinkles. Also didn't do this, I wanted it to be more like a dessert burrito that you could pick up with your hands.
- Garnish the desserts with the fresh berries and serve. I'm not big into garnishing.

----------

So I made these, took one bite, then realized I had bought corn tortillas instead of flour ones. IT MAKES A DIFFERENCE - so make sure you get flour tortillas. Other than that they were very tasty! One of my friends decided to make some, but he said "Every one I made, I ate. So I stopped making them". So in my book, that means SUCCESS!!

It's also something super easy that you can make if you have kids, or are having a party. The guests can just make their own wrap, and they can leave out the ingredients they don't like.

Side note - if you are working somewhere that you have to plan programs for students (Sara K.), you can also turn this into part of a Mexican celebration!

Enjoy! - apes -

Monday, May 3, 2010

Pineapple Upside-Down Cupcake

Are you getting the point that I like pineapple flavors yet? Because I do!

This is the FIRST cupcake from my cupcake recipe book that I got from Ashley. We had a staff meeting Sunday morning, so I wanted to make something for the guys (and girls!). So I got all the ingredients, now I just needed to figure out when I'd be able to make them (since the cookout was Saturday).

Well, that was solved after a few drinks at the cookout. The guys wanted to order whatever fight was on...so I grabbed my apron (homemade by my Grandma) and got to baking (prob not the best idea after margaritas and sangria)!

Below is the recipe, I added my "modifications" in ugly orange.

----------

Pineapple upside-down cupcakes

Topping Ingredients
- 20oz. can crushed pineapple
- 1/2 cup (1 stick) sweet butter, melted sweet cream butter is what I used (I assume it's the same)
- 3/4 cup packed brown sugar

Cupcake Ingredients
- 1 cup (2 sticks) sweet butter, softened
- 1 cup superfine sugar
- 2 cups self-rising flour
- 4 eggs
- 1 tsp. vanilla extract

Directions
- Preheat oven to 350degrees
- Grease two 12-cup muffin pans with butter (I just sprayed them with PAM) and dust with a little flour, tapping out the excess (I pretty much just got flour everywhere doing this).
- In the bottom of each cup, drizzle 1 tablespoon melted butter, 1 tablespoon pineapple, and 1 tablespoon brown sugar. OK, so I originally thought they meant like 1 tablespoon of EACH in EACH cup, but then I realized when I was doing that, you need a lot more ingredients then what was originally stated. So maybe they meant put a tablespoon of each ingredient together, and spread that out into the cupcake pans?
- Place all the cupcake ingredients in a large bowl and beat with an electric mixer until smooth and pale, about 2-3 minutes. I surprisingly had no problems with this. I'm sure the guys weren't happy about the noise while the fight was on though.
- Spoon batter on top of the pineapple mix in each cup.
- Bake for 25 minutes. I pulled them out with about 2 min left, and they were already a little brown on top.
- Remove pans from oven and cool for 10minutes.
- Turn out the cupcakes onto serving dishes and eat. Or be like a fatty like me and just inhale them.
- Store in an airtight container for up to 2 days. Or remember right before you pass out to put saran wrap over them while they are still in the muffin pans, and feed them to the bike shop crew the next morning.

----------

Spicy sent me a pic when he ate one, because I ate all mine before I remembered to snap a pic!

So as you can see, drunk baking isn't too bad! But as my friend Kevin said "I've never heard someone use so many curse words with baking before they even put the dish in the oven!" Thanks Kev. I let the guys try them when I was done, and I guess putting a tablespoon of everything in each cup worked - they tasted AWESOME! And the best part was that in the AM - I woke up to already-made cupcakes! SCORE!

I can tell I will become a BIG fan of this cupcake book. If the book was on facebook, I'd invent the "LOVE" button just so I could "like" it a lot. I can't wait to try more recipes!

- Enjoy! apes -

Grilled Pineapple Slices

Saturday at our place we had our annual pre-cinco de mayo cookout. We had some good food brought by everyone, and I brought out my SWEET new Pineapple Slicer.

I found it on Amazon, and check it out:

It looks like a crazy corkscrew!


Um, how awesome does this look?

It's super easy to use. Chop off the head of the pineapple, and then stick the corkscrew in and twist it and once you get as much as you want, just pull it out (lots of "that's what she said" going on in that sentence). You can use the pineapple slices for anything; eating as is, putting in a punch, grilling, etc. Then you can use the shell as a cup for your drink (obv the whole reason to buy this!).

So I made 3 "pineapple cups" - but one was a little dip and leaked, so we used that to hold our straws. The other 2 we used as cups for my Roomster and I. We put umbrellas in the pineapples, and I eventually filled mine full of Varun's homemade Sangria.
Perfect drink for a hot day!

I took the insides of the cups and used this DELICIOUS Recipe:

----------

Grilled Pineapple Slices

Ingredients
- Pineapple Slices
- Coconut Milk (found in the oriental aisle of the grocery store)
- Cinnamon
- Sugar

Directions
- Dip the slices of pineapple into coconut milk
- Mix the cinnamon and sugar, and then dip the pineapple slices into the mix
- Put on grill until brown
- Eat like it's candy!!

----------
Sorry, no picture of this, they went to fast! They were a GREAT snack! It tasted like candy, but not super sweet. Throw that on a burger, or a kabob for a sweet taste!!

- Enjoy! apes -